
sm 기술 블로그
[스프링부트] Websocket(stomp) 구현 본문
웹소캣은 양방향 통신을 제공하여 예를들어 유저 1이 메세지를 보내면 유저 2에게 실시간으로 도착하고 반대로 유저 2가 유저 1에게 메시지를 보내면 실시간으로 도착하도록 하는 프로토콜이다.
- 본 방법은 웹 소캣을 이해하기 위한 방법으로 가공없이 프로젝트에 바로 적용이 불가능 하다.
1. Config
import org.springframework.context.annotation.Configuration;
import org.springframework.messaging.simp.config.MessageBrokerRegistry;
import org.springframework.web.socket.config.annotation.EnableWebSocketMessageBroker;
import org.springframework.web.socket.config.annotation.StompEndpointRegistry;
import org.springframework.web.socket.config.annotation.WebSocketMessageBrokerConfigurer;

@Configuration
@EnableWebSocketMessageBroker
public class WebSocketConfig implements WebSocketMessageBrokerConfigurer {

    @Override
    public void configureMessageBroker(MessageBrokerRegistry config) {
        config.enableSimpleBroker("/topic");
        config.setApplicationDestinationPrefixes("/app");
    }

    @Override
    public void registerStompEndpoints(StompEndpointRegistry registry) {
        registry.addEndpoint("/gs-guide-websocket").withSockJS();
    }

}
1.
- @EnableWebSocketMessageBroker : 웹소켓 서버를 사용한다는 설정.
- WebSocketMessageBrokerConfigurer : 웹소캣 연결 속성으로 config가 상속을 받았다.
2. configureMessgaBroker : Stomp사용을 위한 Message Broker 설정을 해주는 메소드.
- enableSimpleBroker("/queue" , "/topic") : 스프링에서 제공하는 내장 브로커 함수로 큐는 1:1 토픽은 1:N이다.
(※ api에 prefix로 붙은 경우, messageBroker가 해당 경로를 가로챈다.)
- setApplicationDestinationPrefixes("/app") : 메시지를 보낼 때 관련 경로를 설정해준다.
(※ 경로 앞에 /app이 붙어있으면 Broker로 보내진다.)
3. registerStompEndpoints : 소캣 연결과 관련된 설정
- addEndpoint : 소캣 연결 URI
- withSockJS() : 소켓을 지원하지 않는 브라우저라면, sockJS를 사용하도록 설정
2. Model
HelloMessage
import lombok.Data;

@Data
public class HelloMessage {

    private String name;

    public HelloMessage() {
    }

    public HelloMessage(String name) {
        this.name = name;
    }
}
생성자를 이용해 이름을 HelloMessage 에 저장한다.
HelloMessage 는 다음과 같은 형태를 지닌다.
{
    "name": "망소"
}
Greeting
import lombok.Data;

@Data
public class Greeting {

    private String content;

    public Greeting() {
    }

    public Greeting(String content) {
        this.content = content;
    }
}
생성자를 이용해 내용을 Greeting에 저장한다.
Greeting은 다음과 같은 형태를 지닌다.
{
    "content": "Hello, 망소!"
}
※ hello 가 붙는 이유는 컨트롤러에서 작업할 것이다.
3. controller
import org.springframework.messaging.handler.annotation.MessageMapping;
import org.springframework.messaging.handler.annotation.SendTo;
import org.springframework.stereotype.Controller;
import org.springframework.web.util.HtmlUtils;

@Controller
public class GreetingController {


    @MessageMapping("/hello")
    @SendTo("/topic/greetings")
    public Greeting greeting(HelloMessage message) throws Exception {
        return new Greeting("Hello, " + HtmlUtils.htmlEscape(message.getName()) + "!");
    }

}
@MessageMapping : 어노테이션에 발행하는 경로를 작성한다.
@SendTo : 어노테이션에 구독 경로를 작성한다.
new Greeting(~~) 글을 작성하여 Greeting에 담는다.
전체적인 로직을 그림을 통해 나타내면
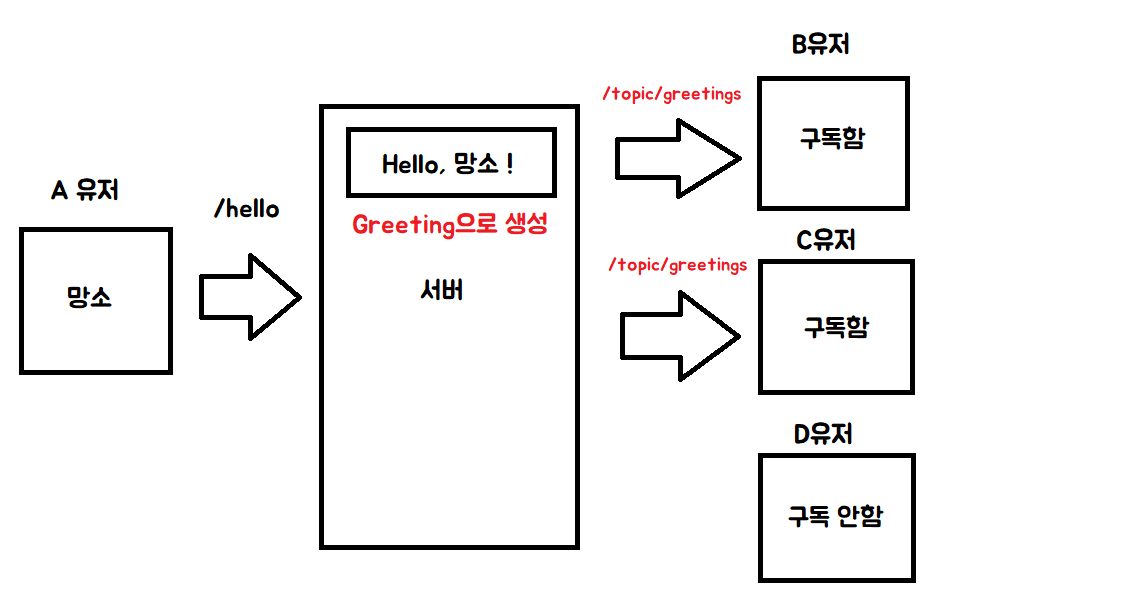
다음과 같다.
4. Index.html
<!DOCTYPE html>
<html>
<head>
    <title>Hello WebSocket</title>
    <link href="/webjars/bootstrap/css/bootstrap.min.css" rel="stylesheet">
    <link href="/main.css" rel="stylesheet">
    <script src="/webjars/jquery/jquery.min.js"></script>
    <script src="/webjars/sockjs-client/sockjs.min.js"></script>
    <script src="/webjars/stomp-websocket/stomp.min.js"></script>
    <script src="/app.js"></script>
</head>
<body>
<noscript><h2 style="color: #ff0000">Seems your browser doesn't support Javascript! Websocket relies on Javascript being
    enabled. Please enable
    Javascript and reload this page!</h2></noscript>
<div id="main-content" class="container">
    <div class="row">
        <div class="col-md-6">
            <form class="form-inline">
                <div class="form-group">
                    <label for="connect">WebSocket connection:</label>
                    <button id="connect" class="btn btn-default" type="submit">Connect</button>
                    <button id="disconnect" class="btn btn-default" type="submit" disabled="disabled">Disconnect
                    </button>
                </div>
            </form>
        </div>
        <div class="col-md-6">
            <form class="form-inline">
                <div class="form-group">
                    <label for="name">What is your name?</label>
                    <input type="text" id="name" class="form-control" placeholder="Your name here...">
                </div>
                <button id="send" class="btn btn-default" type="submit">Send</button>
            </form>
        </div>
    </div>
    <div class="row">
        <div class="col-md-12">
            <table id="conversation" class="table table-striped">
                <thead>
                <tr>
                    <th>Greetings</th>
                </tr>
                </thead>
                <tbody id="greetings">
                </tbody>
            </table>
        </div>
    </div>
</div>
</body>
</html>
id name에서 이름을 입력 받는다.
id conversation에서 환영 메시지를 출력한다.
5. app.js
var stompClient = null;

function setConnected(connected) {
    $("#connect").prop("disabled", connected);
    $("#disconnect").prop("disabled", !connected);
    if (connected) {
        $("#conversation").show();
    }
    else {
        $("#conversation").hide();
    }
    $("#greetings").html("");
}

function connect() {
    var socket = new SockJS('/gs-guide-websocket');
    stompClient = Stomp.over(socket);
    stompClient.connect({}, function (frame) {
        setConnected(true);
        console.log('Connected: ' + frame);
        stompClient.subscribe('/topic/greetings', function (greeting) {
            showGreeting(JSON.parse(greeting.body).content);
        });
    });
}

function disconnect() {
    if (stompClient !== null) {
        stompClient.disconnect();
    }
    setConnected(false);
    console.log("Disconnected");
}

function sendName() {
    stompClient.send("/app/hello", {}, JSON.stringify({'name': $("#name").val()}));
}

function showGreeting(message) {
    $("#greetings").append("<tr><td>" + message + "</td></tr>");
}

$(function () {
    $("form").on('submit', function (e) {
        e.preventDefault();
    });
    $( "#connect" ).click(function() { connect(); });
    $( "#disconnect" ).click(function() { disconnect(); });
    $( "#send" ).click(function() { sendName(); });
});
코드하나하나 분석해보자.
setConnected(connected)
function setConnected(connected) {
    $("#connect").prop("disabled", connected);
    $("#disconnect").prop("disabled", !connected);
    if (connected) {
        $("#conversation").show();
    }
    else {
        $("#conversation").hide();
    }
    $("#greetings").html("");
}
연결이 되어있는 경우 connect 버튼이 disabled(클릭 불가) 이고 반대로 연결이 끊긴상태는 disconnect 버튼이 connect 버튼이 disabled(클릭 불가) 이다.
또한 만약 연결이 되어있다면 대화를 보여주고 그렇지 않으면 대화를 보여주지 않는다.
(실제로 대화가 보여지는 부분은 id가 greetings부분임)
connect()
function connect() {
    var socket = new SockJS('/gs-guide-websocket');
    stompClient = Stomp.over(socket);
    stompClient.connect({}, function (frame) {
        setConnected(true);
        console.log('Connected: ' + frame);
        stompClient.subscribe('/topic/greetings', function (greeting) {
            showGreeting(JSON.parse(greeting.body).content);
        });
    });
}
소켓과 연결하는 부분으로 아까 우리는 config에서 /gs-guide-websocket를 endpoint(연결 url)로 정의했다.
연결을 하고 위의 setConnected 함수를 실행하며 콘솔에 연결 됨을 출력한다.
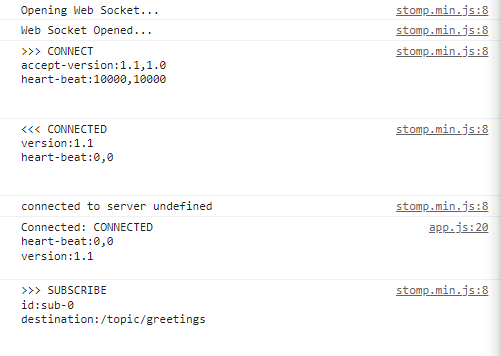
다음과 같이 console을 찍을 것이다.
subscribe는 구독을 나타내며 아까 컨트롤러 부분에 /topic/greetings를 sendTo에 정의 하였다.
그리고 받은 값을 showGreeting 함수를 실행하여 태그를 추가시켜준다.
disconnect()
function disconnect() {
    if (stompClient !== null) {
        stompClient.disconnect();
    }
    setConnected(false);
    console.log("Disconnected");
}
연결을 끊는 과정이다.
sendName()
function sendName() {
    stompClient.send("/app/hello", {}, JSON.stringify({'name': $("#name").val()}));
}
app/hello로 이름을 보낸다.
우리는 app/hello를 @MessageMapping에 경로를 정의해 주었다.
showGreeting(message)
function showGreeting(message) {
    $("#greetings").append("<tr><td>" + message + "</td></tr>");
}
id를 greetings로 가진 태그에 테이블 값을 추가해준다.
etc
$(function () {
    $("form").on('submit', function (e) {
        e.preventDefault();
    });
    $( "#connect" ).click(function() { connect(); });
    $( "#disconnect" ).click(function() { disconnect(); });
    $( "#send" ).click(function() { sendName(); });
});
폼, 연결, 끊기, 전송 이벤트 관련 부분이다.
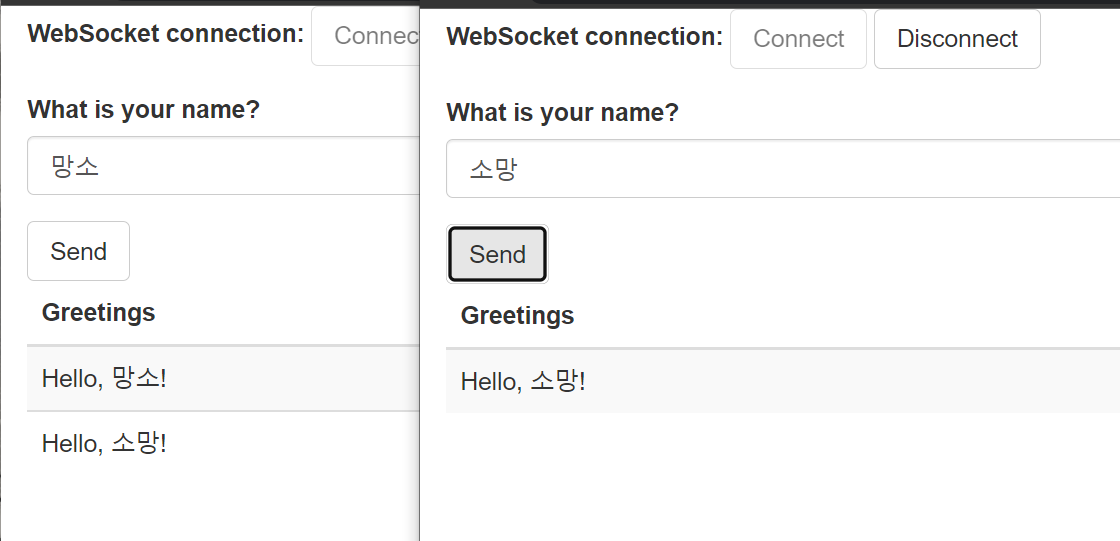
최종적으로 위 코드를 복사 붙여놓기만 해도 아래와 같은 결과를 도출할 수 있다.
'스프링부트' 카테고리의 다른 글
| [스프링부트/jpa] 기본키(pk) 매핑 방법 및 생성 전략 (0) | 2022.09.17 |
|---|---|
| [스프링부트 + 리액트] websocket 구현 (0) | 2022.09.15 |
| [스프링부트 / 리액트] JWT를 Header에 넣어서 요청 (0) | 2022.09.13 |
| [스프링부트] WebSocket와 stomp (0) | 2022.09.13 |
| [스프링부트] 파일 이름 변경 (0) | 2022.09.11 |

