sm 기술 블로그
[스프링부트] 이메일 보내기 본문
사전 작업
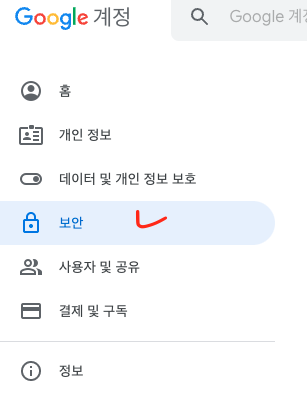
1)구글에 로그인한후 계정관리자를 들어간다.

2)왼쪽의 보안 탭으로 들어가자

3)2단계 인증을 활성화한다(앱 비밀번호를 받기 위함)

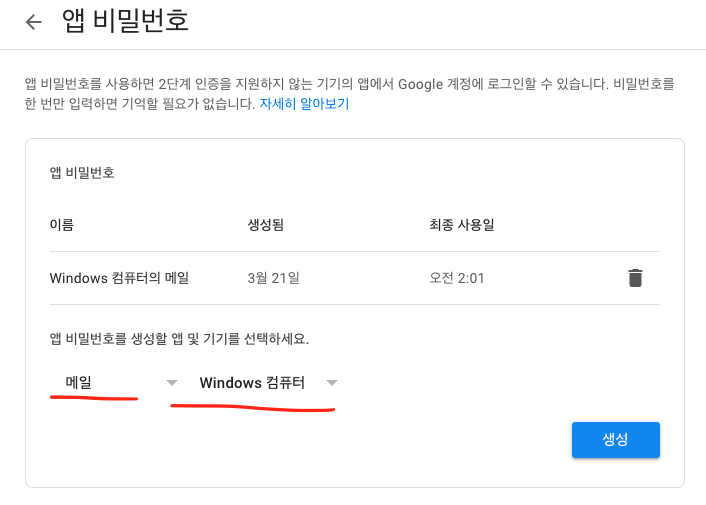
4)앱 비밀번호를 클릭해서 - 메일 / - Windows 컴퓨터를 선택한다

5)생성을 누르고 받아온 기기용 앱 비밀번호를 password란에 기입한다.

적용
의존성 추가
	implementation 'org.apache.commons:commons-lang3:3.12.0'
	implementation 'org.springframework.boot:spring-boot-starter-mail'
lang은 문자를 랜덤으로 조합하기 위해서 사용된다.
starter-mail은 메일을 보내기 위해서 사용된다.
application.yml
  mail:
    host: smtp.gmail.com
    port: 587
    username: 구글 아이디
    password: 발급받은 비번
    properties:
      mail:
        smtp:
          starttls:
            enable: true
            required: true
          auth: true
          connectiontimeout: 5000
          timeout: 5000
          writetimeout: 5000
controller
import com.mysite.sbb33.service.MailService;
import com.mysite.sbb33.vo.MailDto;
import lombok.RequiredArgsConstructor;
import org.springframework.stereotype.Controller;
import org.springframework.web.bind.annotation.GetMapping;
import org.springframework.web.bind.annotation.PostMapping;
import org.springframework.web.bind.annotation.ResponseBody;

@RequiredArgsConstructor
@Controller
public class MailController {
    private final MailService mailService;

    @GetMapping("/mail")
    public String dispMail() {
        return "user/mail";
    }

    @PostMapping("/mail")
    @ResponseBody
    public String execMail(MailDto mailDto) {
        mailService.mailSimpleSend(mailDto);
//        mailService.mailSend(mailDto);
        return """
                <script>
                alert("메일을 성공적으로 보냈습니다.");
                history.back();
                </script>
                """;
    }

}
메일을 처리하는 컨트롤러를 따로 빼놨다.
Post방식으로 맵핑이 들어오면 메일을 보낼것이다.
Service
import com.example.testproject.dto.MailDto;
import com.example.testproject.handler.MailHandler;
import lombok.AllArgsConstructor;
import org.apache.commons.lang.RandomStringUtils;
import org.springframework.mail.SimpleMailMessage;
import org.springframework.mail.javamail.JavaMailSender;
import org.springframework.scheduling.annotation.Async;
import org.springframework.stereotype.Service;

@Service
@AllArgsConstructor
public class MailService {
    private JavaMailSender mailSender;
    private static final String FROM_ADDRESS = "no_repy@boki.com";

    @Async
    public void mailSimpleSend(MailDto mailDto) {
        SimpleMailMessage message = new SimpleMailMessage();
        String msg = mailDto.getMessage() + "\n인증번호는 " + RandomStringUtils.randomAlphanumeric(6) + "입니다";
        message.setTo(mailDto.getAddress());
//        message.setFrom(MailService.FROM_ADDRESS); // 구글 정책 변경으로 설정한 gmail로 가게됨
        message.setSubject(mailDto.getTitle());
        message.setText(msg);
        mailSender.send(message);
    }

    @Async
    public void justSend(MailDto mailDto) {
        SimpleMailMessage message = new SimpleMailMessage();
        message.setSubject(mailDto.getTitle());
        message.setText(mailDto.getMessage());
        mailSender.send(message);
    }
}
@Async는 비동기이다.
비동기란 요청을 보냈을 때 응답 상태와 상관없이 다음 동작을 수행 할 수 있도록 한다.
즉, A 작업이 시작하면 동시에 B작업이 실행된다.
AsyncConfig 추가
import org.springframework.scheduling.concurrent.ThreadPoolTaskExecutor;
import java.util.concurrent.Executor;

public class AsyncConfig extends AsyncConfigurerSupport {

    public Executor getAsyncExecutor() {
        ThreadPoolTaskExecutor executor = new ThreadPoolTaskExecutor();
        executor.setCorePoolSize(2);
        executor.setMaxPoolSize(10);
        executor.setQueueCapacity(500);
        //executor.setThreadNamePrefix("hanumoka-async-");
        executor.initialize();
        return executor;
    }
}
눈에 보이는 동작은 없으나 스레드가 최대개수만큼 생성되는것을 막기위해서 작성이 필요하다.
DTO 추가
import lombok.AllArgsConstructor;
import lombok.Getter;

@AllArgsConstructor
@Getter
public class MailDto {
    private String address;
    private String title;
    private String message;
}
순서대로 메일을 보내는 주소, 제목, 메시지 이다.
form 추가
<!DOCTYPE html>
<html lang="en" xmlns:th="http://www.w3.org/1999/xhtml">
<head>
    <meta charset="UTF-8">
    <title>메일 발송</title>
</head>
<body>
<h1>메일 발송</h1>

<form th:action="@{/mail}" method="post">
    <input name="address" placeholder="이메일 주소"> <br>
    <input name="title" placeholder="제목"> <br>
    <textarea name="message" placeholder="메일 내용을 입력해주세요." cols="60" rows="20"></textarea>
    <button>발송</button>
</form>
</body>
</html>
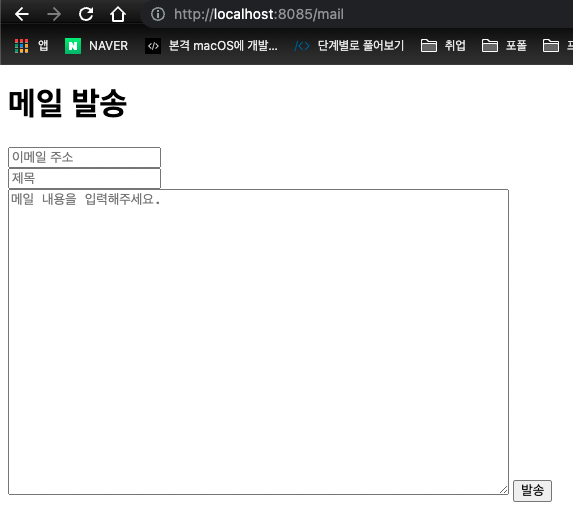
발송 버튼을 누르면 이메일이 전송된다.
예시

다음과 같은 화면이 뜰거고 항목을 입력하고 발송을 누르면

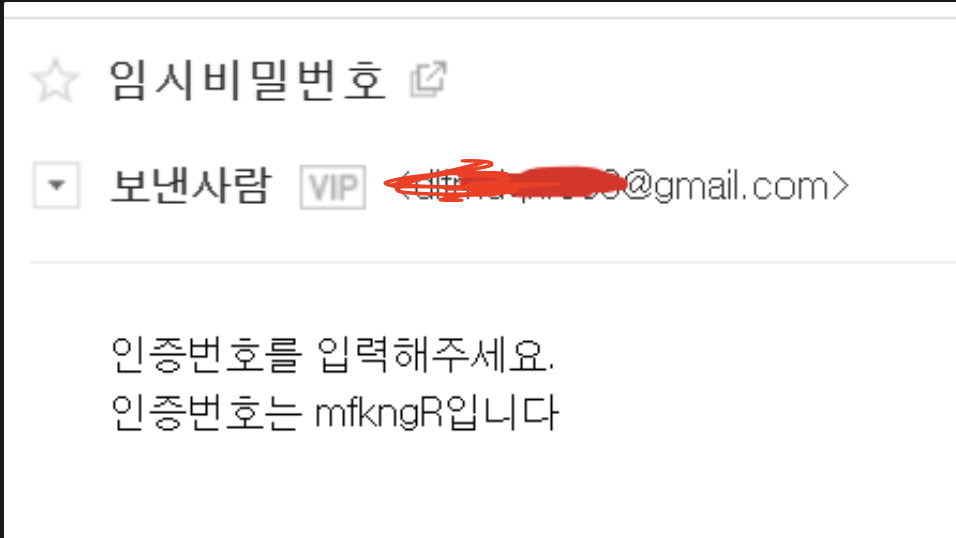
다음과 같이 이메일이 도착할 것이다.
'스프링부트' 카테고리의 다른 글
| [스프링부트] 403 에러 (0) | 2022.08.09 |
|---|---|
| [스프링부트] 검색기능 (JPA) (0) | 2022.08.08 |
| [스프링부트] 웹페이지 카톡 공유하기(feat.Thymeleaf) (0) | 2022.07.30 |
| [스프링 시큐리티] 로그아웃 (0) | 2022.07.23 |
| [스프링 시큐리티] 로그인 (0) | 2022.07.23 |
Comments


