
sm 기술 블로그
객체지향 (Object /enum / 복제,참조 /제네릭) 본문
Object
모든 클래스들의 조상
toString()
class Calculator{
    int left, right;

    public void setOprands(int left, int right){
        this.left = left;
        this.right = right;
    }
    public void sum(){
        System.out.println(this.left+this.right);
    }

    public void avg(){
        System.out.println((this.left+this.right)/2);
    }
}

public class CalculatorDemo {

    public static void main(String[] args) {

        Calculator c1 = new Calculator();
        c1.setOprands(10, 20);
        System.out.println(c1);
    }

}
//출력 결과
org.opentutorials.javatutorials.progenitor.Calculator@11be650f패키지와, 메소드 의 내용이 나온다 (@ 이후는 의미 없음)
여기에. toString을 붙여
class Calculator{
    int left, right;

    public void setOprands(int left, int right){
        this.left = left;
        this.right = right;
    }
    public void sum(){
        System.out.println(this.left+this.right);
    }

    public void avg(){
        System.out.println((this.left+this.right)/2);
    }
}

public class CalculatorDemo {

    public static void main(String[] args) {

        Calculator c1 = new Calculator();
        c1.setOprands(10, 20);
        System.out.println(c1.toString());
    }

}
다음과 같이 변경해준다해도 출력 결과는 같다. (이미 object에서 toString을 자동적으로 붙여주기 때문에)
class Calculator{
    int left, right;

    public void setOprands(int left, int right){
        this.left = left;
        this.right = right;
    }
    public void sum(){
        System.out.println(this.left+this.right);
    }

    public void avg(){
        System.out.println((this.left+this.right)/2);
    }

    public String toString() {
    	return "left : " + this.left + ", right : " + this.right;
    }
}

public class Main {

    public static void main(String[] args) {

        Calculator c1 = new Calculator();
        c1.setOprands(10, 20);
        System.out.println(c1.toString());
    }

}
우리는 toString을 오버라이딩 하여 재정의 하였다. 결과를 사용자의 기호에 맞게 바꿀 수 있다.
만약 toString을 제거 한다 하더라도 출력 결과는 오버라이딩 한 대로 나올 것이다.
그런데 만약 toString의 기본 로직과 오버라이딩한 로직을 같이 출력하고 싶다면,
return super.toString() + ", left : " + this.left + ", right : " + this.right; 로 바꿔주면 된다.
출력 결과는 아래와 같다.

equals()
class Student{

    String name;
    Student(String name){
        this.name = name;
    }

    public boolean equals(Object obj) {
    	// object obj = s2 라는 과정 [자식이 부모행세 하는것은 가능]
    	// s2 자식 , object 부모

        Student _obj = (Student)obj;
        // 기본적으로 부모가 자식의 행세를 하는것은 불가능하다
        // 부모는 없던거를 만드는것이기 때문에 불가능한 것
        // (Student)로 형변환을 하여 대입할 수 있다.
        // obj 부모 , Student 자식

        return name == _obj.name;
    }
}

class Main {

    public static void main(String[] args) {
        Student s1 = new Student("egoing");
        Student s2 = new Student("egoing");
        System.out.println(s1 == s2);
        System.out.println(s1.equals(s2));
        // 다형성으로 인해 Student(String name)에 접근하지 않고 equals 메소드에 접근한다.
        // 따라서 Student _obj = (String)obj;가 필요하다.

    }

}
자식 클래스를 부모 클래스에 할당한다. 그래서 Object obj에 들어가 있는 값은 s2고 데이터 타입을 Object로 하게 된다면, name이라는 변수에 접근할 수 없다.
그 이유는 Object는 name이라는 변수가 존재하지 않기 때문이다. -> 다형성!
Student _obj = (Student) obj; 이 구문을 통해 name에 접근 가능하도록 해준다.
hashCode()는 개인적으로 알아보자.
==을 쓰는 경우
원시 데이터 형(Primitive Data Type)이란 자바에서 기본적으로 제공하는 데이터 타입으로 byte, short, int, long, float, double, boolean, char가 있다.
이러한 데이터 타입들은 new 연산자를 이용해서 생성하지 않아도 사용될 수 있다는 특징이 있다.
finalize()
객체가 소멸될 때 호출되도록 약속된 메소드. 이 메소드는 여러 가지 이유로 개발자들은 finalize 않으려고 한다.
이것보다는 가비지 컬렉션(garbage collection)에 대해서 아는 것이 중요하다.
https://d2.naver.com/helloworld/1329
clone()
class Student implements Cloneable{
    String name;
    Student(String name){
        this.name = name;
    }
    protected Object clone() throws CloneNotSupportedException{
        return super.clone();
    }
}

class Main {

    public static void main(String[] args) {
        Student s1 = new Student("egoing");
        try {
            Student s2 = (Student)s1.clone();
            // 복제를 하려면 복제 가능한 객체라는 사실을 알려줘야한다.
            // Cloneable이라는 인터페이스를 생성해주면 된다.
            // Cloneable은 복제가능하다는 것을 알려주는 약속으로
            // Cloneable은 본문을 가지고 있지 않다.

            System.out.println(s1.name);
            System.out.println(s2.name);
        } catch (CloneNotSupportedException e) {
            e.printStackTrace();
        }
    }

}
모든 클래스의 조상은 object이다.
그래서 기본적인 메소드를 가지고 있고 그것을 오버라이딩을 통해 사용자가 원하는 대로 사용할 수 있다.
enum
상수는 변하지 않는 값이다. 그래서 1=2는 성립할 수 없다.
public class Main {

    private final static int APPLE = 1;
    private final static int PEACH = 2;
    private final static int BANANA = 3;


    public static void main(String[] args) {
        int type = APPLE;
        switch(type){
            case APPLE:
                System.out.println(57+" kcal");
                break;
            case PEACH:
                System.out.println(34+" kcal");
                break;
            case BANANA:
                System.out.println(93+" kcal");
                break;
        }
    }
}
자신뿐만 아니라 다른사람이 코드를 봤을 때 코드에 대한 이해를 쉽게 하기 위해서 상수를 문자로 사용하였다.
그래서 이름만 보면 대충 이해는 가능하다.
public class ConstantDemo {
    // fruit
    private final static int FRUIT_APPLE = 1;
    private final static int FRUIT_PEACH = 2;
    private final static int FRUIT_BANANA = 3;

    // company
    private final static int COMPANY_GOOGLE = 1;
    private final static int COMPANY_APPLE = 2;
    private final static int COMPANY_ORACLE = 3;

    public static void main(String[] args) {
        int type = FRUIT_APPLE;
        switch(type){
            case FRUIT_APPLE:
                System.out.println(57+" kcal");
                break;
            case FRUIT_PEACH:
                System.out.println(34+" kcal");
                break;
            case FRUIT_BANANA:
                System.out.println(93+" kcal");
                break;
        }
    }
}
이런식으로 고유의 값을 지정할 수 있다.
그런데 코드가 너무 지저분하다.... 정리해보자.
interface FRUIT{
    int APPLE=1, PEACH=2, BANANA=3;
}
interface COMPANY{
    int GOOGLE=1, APPLE=2, ORACLE=3;
}
 // 위에서는 이름을 이용해서, 여기서는 문법을 이용해서 구분한 것이다.

public class ConstantDemo {

    public static void main(String[] args) {
        int type = FRUIT.APPLE;
        switch(type){
            case FRUIT.APPLE:
                System.out.println(57+" kcal");
                break;
            case FRUIT.PEACH:
                System.out.println(34+" kcal");
                break;
            case FRUIT.BANANA:
                System.out.println(93+" kcal");
                break;
        }
    }
}
여기에서 interface 에서 필드를 작성한다는 것은 public final static int이 포함되어 있음을 암시하는 것이다.
하지만 위에 코드는 단점이 있다. 과일 애플과 기업 애플이 가지고 있는 숫자가 같다면 이 둘은 같다고 판단할 것이다.
이러한 문제를 처리할 필요가 있다.
유용한 팁 -> ctrl+우측 클릭+리 펙터 링+리네임을 하면 한 번에 이름을 변경할 수 있다.
class Fruit{
    public static final Fruit APPLE  = new Fruit();
    public static final Fruit PEACH  = new Fruit();
    public static final Fruit BANANA = new Fruit();
}
class Company{
    public static final Company GOOGLE = new Company();
    public static final Company APPLE = new Company();
    public static final Company ORACLE = new COMPANY(Company);
}

public class ConstantDemo {

    public static void main(String[] args) {
        if(Fruit.APPLE == Company.APPLE){
            System.out.println("과일 애플과 회사 애플이 같다.");
        }
    }
}
이렇게 데이터 타입을 다르게 만들어 비교 자체를 불가능하게 만들 수 있다.
하지만 class 데이터 타입의 상수는 switch에서 사용할 수 없다. 이걸 enum을 통해서 해결해보자.
enum
배열은 서로 연관된 값들의 집합이라면 enum 즉, 열거형은 서로 연관된 상수들의 집합이다.
위에 지저분한 코드를 enum을 이용한다면
enum Fruit{
	//Fruit도 클래스이다.

    APPLE, PEACH, BANANA;

  	//public ~~~ 과 같은 뜻이다.
    //public static~~~ 은 많이 사용하기 때문에 간소화하기위해 만든것
}
enum Company{
    GOOGLE, APPLE, ORACLE;
}

public class ConstantDemo {

    public static void main(String[] args) {
        /*
        if(Fruit.APPLE == Company.APPLE){
            System.out.println("과일 애플과 회사 애플이 같다.");
        }
        */
        Fruit type = Fruit.APPLE;
        switch(type){
            case APPLE:
            	// APPLE 레이블
                System.out.println(57+" kcal");
                break;
            case PEACH:
            	// PEACH 레이블
                System.out.println(34+" kcal");
                break;
            case BANANA:
            	// BANANA 레이블
                System.out.println(93+" kcal");
                break;
        }
    }
}
다음과 같이 깔끔하게 바꿀 수 있다.
이렇게 되면 type은 에러를 표출하지 않을 것이다.
또한 Fruit.APPLE이 아닌 APPLE이라고 해야 에러가 없어질 것이고, 이것은 코딩을 더 간결하게 만든다.
그래서 enum의 사용 이유는
- 코드가 단순해진다.
- 인스턴스 생성과 상속을 방지한다.
- 키워드 enum을 사용하기 때문에 구현의 의도가 열거임을 분명하게 나타낼 수 있다.
enum과 생성자
enum Fruit{
    APPLE("red"), PEACH("pink"), BANANA("yellow");
	//()는 생성자를 호출한는 것을 의미하고 컬러값을 대입 시킴
	// enum안에는 메소드도,변수도 생성할 수 있다.

    private String color;

    // private로 color를 무단으로 변경하는 것을 막을 수 있음
    public String getColor() {
    	return this.color;
    }

    Fruit(String color){
        System.out.println("Call Constructor "+this);
        this.color = color;
    }
}

enum Company{
    GOOGLE, APPLE, ORACLE;
}

public class Main {

    public static void main(String[] args) {
        /*
        if(Fruit.APPLE == Company.APPLE){
            System.out.println("과일 애플과 회사 애플이 같다.");
        }
        */
        Fruit type = Fruit.APPLE;
        switch(type){
            case APPLE:
                System.out.println(57+" kcal, "+Fruit.APPLE.getColor());
                // 뒷 부분 Fruit.APPLE.getColor()는 red를 표시한다.

                break;
            case PEACH:
                System.out.println(34+" kcal, "+Fruit.PEACH.getColor());
                break;
            case BANANA:
                System.out.println(93+" kcal, "+Fruit.BANANA.getColor());
                break;
        }
    }
}
// 출력 결과
Call Constructor APPLE
Call Constructor PEACH
Call Constructor BANANA
57 kcal상수들의 값이 인스턴스화 될 때마다 생성자를 호출하여 세 번의 call constructor을 호출할 것이다.
class Fruit{
    public static final Fruit APPLE  = new Fruit();
    public static final Fruit PEACH  = new Fruit();
    public static final Fruit BANANA = new Fruit();
}
enum Fruit{
APPLE("red"), PEACH("pink"), BANANA("yellow");
private String color;
public String getColor() {
return this.color;
}
Fruit(String color){
System.out.println("Call Constructor "+this);
this.color = color;
}
}두 방법의 가장 큰 차이는 클래스로 상수를 정의하게 되면 각각의 멤버(apple peach banana)를 배열처럼 열거할 수 없다.
열거형이 클래스보다 좋은 점은 열거형의 어떠한 데이터가 있는지 몰라도 마치 배열처럼 열거형의 데이터를 하나씩 꺼내서 사용할 수 있다.
그래서 다음과 같이 쓸 수 있다.
enum Fruit{
    APPLE("red"), PEACH("pink"), BANANA("yellow");
    private String color;
    Fruit(String color){
        System.out.println("Call Constructor "+this);
        this.color = color;
    }
    String getColor(){
        return this.color;
    }
}

enum Company{
    GOOGLE, APPLE, ORACLE;
}

public class Main {

    public static void main(String[] args) {
        for(Fruit f : Fruit.values()){
        	//values를 통해 Fruit의 데이터들을 하나씩 꺼내서 f에 담는다.

            System.out.println(f+", "+f.getColor());
        }
    }
}
//출력결과
Call Constructor APPLE
Call Constructor PEACH
Call Constructor BANANA
APPLE, red
PEACH, pink
BANANA, yellow참조(reference)
new로 생성하는 자료들은 참조 자료형이다.
복제
public class ReferenceDemo1 {

    public static void runValue(){
        int a = 1;
        int b = a;
        b = 2;
        System.out.println("runValue, "+a);
    }

    public static void main(String[] args) {
        runValue();
    }

}
a의 값을 b에 복제하고 b를 2로 바꿨을 때 a의 값은 어떻게 될 것인가?
당연히 a는 1이다.
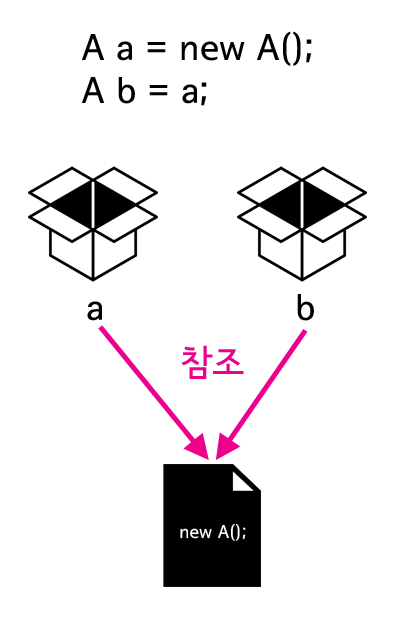
참조
class A{
    public int id;
    A(int id){
        this.id = id;
    }
}

public class Main {

    public static void runValue(){
        int a = 1;
        int b = a;
        // 변수 a에담겨있는 1을 복제해서 b에 넣는다는 뜻.

        b = 2;
        System.out.println("runValue, "+a);
    }

    public static void runReference(){
        A a = new A(1);
        // 변수 a는 클래스 A의 인스턴스 주소값을 가지고 있는거
        A b = a;
        // A 타입인 b에 인스턴스화한 a를 담는다.
        // 변수 a가 가지고있는 클래스 A의 인스턴스 주소값을 b에 넣는거

        b.id = 2;
        // b를 2로 변경했을때? -> 2로 바뀐다.
        System.out.println("runReference, "+a.id);
    }
    // 기본데이터 타입이 담겨있는 1은 b에 복제가 되지만


    public static void main(String[] args) {
        runValue();
        runReference();
    }

}
//출력결과
runValue, 1
runReference, 2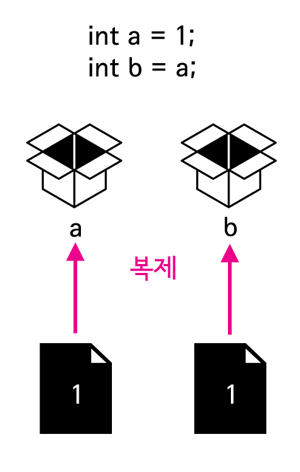
복제와 참조에 대한 예시는 아래 동영상을 참고하자.
https://www.youtube.com/watch?v=5XclqQAviyU&list=PLuHgQVnccGMCeAy-2-llhw3nWoQKUvQck&index=144
복제는 파일을 복사 붙여놓기, 참조는 파일을 바로가기한 것과 같다 라는 내용.
메소드와 매개변수의 참조
class A{
    public int id;
    A(int id){
        this.id = id;
    }
}

public class Main {

    static void _value(int b){
        // 메소드에 매개변수로 b를 받는다
    	// 이건 int b=a; 와 같은 말이다.

    	b = 2;
    }

    public static void runValue(){
        int a = 1;
        // a라고 하는 변수에 1이 들어 있다. (기본 데이터타입)
        _value(a);
        System.out.println("runValue, "+a);
    }

    static void _reference1(A b){
        b = new A(2);
        // 변수 b가 만들어 졌는데 변수 b는 a가 참조하는 1과 다른 2를 참조하고 있다.
    }

    public static void runReference1(){
        A a = new A(1);
        _reference1(a);
        System.out.println("runReference1, "+a.id);
    }

    static void _reference2(A b){
        b.id = 2;
        // 변수 b는 a가 가지고 있는 주소를 똑같이 가지고 있고 b가 2를 대입하면
        // b,a가 같은 인스턴스 주소를 참조하기 때문에 2를 출력한다.
    }

    public static void runReference2(){
        A a = new A(1);
        _reference2(a);
        System.out.println("runReference2, "+a.id);
    }

    public static void main(String[] args) {
        runValue(); // runValue, 1
        runReference1(); // runReference1, 1
        runReference2(); // runReference2, 2
    }

}
//출력결과
runValue, 1
runReference1, 1
runReference2, 2제네릭
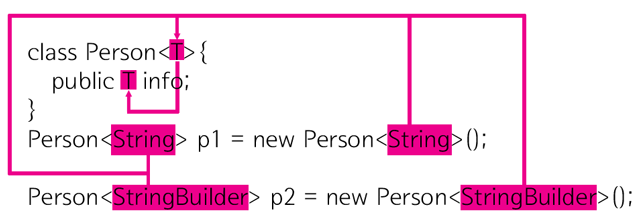
P1의 데이터 타입은 Person <String>
P2의 데이터 타입은 Person <StringBuilder>
제네릭을 왜 쓸까?
class StudentInfo{
    public int grade;
    StudentInfo(int grade){ this.grade = grade; }
}
class StudentPerson{
    public StudentInfo info;
    StudentPerson(StudentInfo info){ this.info = info; }
}
class EmployeeInfo{
    public int rank;
    EmployeeInfo(int rank){ this.rank = rank; }
}
class EmployeePerson{
    public EmployeeInfo info;
    EmployeePerson(EmployeeInfo info){ this.info = info; }
}
public class Main {
    public static void main(String[] args) {
        StudentInfo si = new StudentInfo(2);
        // 성적이 2를 가지고 있음

        StudentPerson sp = new StudentPerson(si);
        System.out.println(sp.info.grade); // 2

        EmployeeInfo ei = new EmployeeInfo(1);
        EmployeePerson ep = new EmployeePerson(ei);

        System.out.println(ep.info.rank); // 1
    }
}
2와 1이 출력되는 코드이다.
여기서 class StudentPerson와 class EmployeePerson의 로직이 같아 사실상 코드의 중복이 발생했다.
그러면 중복을 제거해 보자.
class StudentInfo{
    public int grade;
    StudentInfo(int grade){ this.grade = grade; }
}
class EmployeeInfo{
    public int rank;
    EmployeeInfo(int rank){ this.rank = rank; }
}
class Person{
    public Object info;
    Person(Object info){ this.info = info; }
} // 제네릭
// Object를 통해 Person() 괄호안에 모든 타입이 들어갈 수 있다.
// 이건 자바에서 허용할 수 없다.
// 이것을 타입이 안정하지 않다고 한다.

public class Main {
    public static void main(String[] args) {
        Person p1 = new Person("부장");
        EmployeeInfo ei = (EmployeeInfo)p1.info;
        System.out.println(ei.rank);
    }
}
제네릭을 통해 중복 제거는 성공했으나 Object를 통해 모든 데이터 타입을 허용해버렸다.
제네릭의 특성
class EmployeeInfo{
    public int rank;
    EmployeeInfo(int rank){ this.rank = rank; }
}
class Person<T, S>{
    public T info;
    public S id;
    Person(T info, S id){
        this.info = info;
        this.id = id;
    }
}
public class Main {
    public static void main(String[] args) {
    	Integer id = 1;
    	Person<EmployeeInfo, Integer> p1 = new Person<EmployeeInfo, Integer>(new EmployeeInfo(1), id);
    	System.out.println(p1.id.intValue());
    }
    // 복수의 제네릭이 필요할 때는 이름이 다르고 ,로 구분한다.
    // int, double 등 은 그냥 쓰면 제네릭으로 사용이 불가능하다.
    // 이걸 Integer, Double로 Wrapped 하여 사용할 수 있다.

}
위와 같이 코드를 쓸 수 있지만 더 간결하게 할 수 있다.
그 방법은
https://www.youtube.com/watch?v=MhUb5itcJvk&list=PLuHgQVnccGMCeAy-2-llhw3nWoQKUvQck&index=149
를 보자.
interface Info{
    int getLevel();
}
class EmployeeInfo implements Info{
    public int rank;
    EmployeeInfo(int rank){ this.rank = rank; }
    public int getLevel(){
        return this.rank;
    }
}
class Person<T extends Info>{
    public T info;
    Person(T info){ this.info = info; }
}
public class GenericDemo {
    public static void main(String[] args) {
        Person p1 = new Person(new EmployeeInfo(1));
        Person<String> p2 = new Person<String>("부장");
    }
}
interface를 사용하면 implement를 쓰지만 제네릭에서 extends는 부모가 누구다 라는 것을 알려주는 것이다.
'Java' 카테고리의 다른 글
| [자바]문자열 함수 (0) | 2022.05.04 |
|---|---|
| 객체지향) 컬렉션 프레임워크 (0) | 2022.04.21 |
| 객체지향 (예외) (0) | 2022.04.18 |
| 객체지향 (API /접근제어자 /abstract /final /static /interface /다형성) (0) | 2022.04.17 |
| 객체지향 (유효범위[this] /생성자 /상속[super] /오버로딩 /오버라이딩 /클래스패스 /패키지[import]) (0) | 2022.04.15 |


